Managing public alerts with Filament Notifications in Laravel
Learn how to manage public alerts in your Laravel application using Filament Notifications. A step-by-step guide with model, middleware, and resource panel.

Adding public notifications to your Laravel FilamentPHP application can greatly enhance user engagement and communication. In this guide, we will implement a public notification system using Filament, covering everything from the database model to displaying alerts on public pages.
To use Filament on public pages, you can follow this article: Guide to using Filament Components in public-facing pages. This guide builds upon that configuration.
Step 1: Create the Alert Model
The Alert model represents the notifications that will be displayed to users. It includes fields for the title, message, type, and display duration.
- First, create the
Alertmodel and associated migration file with the necessary fields:
php artisan make:model Alert -m
- Update the generated migration file:
use Illuminate\Database\Migrations\Migration;
use Illuminate\Database\Schema\Blueprint;
use Illuminate\Support\Facades\Schema;

return new class extends Migration {
    public function up(): void
    {
        Schema::create('alerts', function (Blueprint $table) {
            $table->id();
            $table->string('title');
            $table->text('message');
            $table->string('type');
            $table->string('read_more_link')->nullable();
            $table->boolean('is_active')->default(false);
            $table->timestamp('started_display_at');
            $table->timestamp('ended_display_at')->nullable();
            $table->timestamps();
        });
    }

    public function down(): void
    {
        Schema::dropIfExists('alerts');
    }
};
- Modify the generated model file
app/Models/Alert.php:
namespace App\Models;

use App\Enums\AlertTypeEnum;
use Illuminate\Database\Eloquent\Builder;
use Illuminate\Database\Eloquent\Model;

class Alert extends Model
{
    protected $fillable = [
        'title',
        'message',
        'type',
        'is_active',
        'read_more_link',
        'started_display_at',
        'ended_display_at',
    ];

    protected $casts = [
        'type' => AlertTypeEnum::class,
        'started_display_at' => 'datetime',
        'ended_display_at' => 'datetime',
    ];

    public function scopePublished(Builder $query): void
    {
        $query->where('is_active', '=', true)
            ->where('started_display_at', '<=', now())
            ->where(function ($query) {
                $query->where('ended_display_at', '>=', now())
                    ->orWhereNull('ended_display_at');
            });
    }
}
- Run the migration:
php artisan migrate
Step 2: Create the enum for alert types
Using an enum allows us to standardize alert types and associate icons and colors with each type.
namespace App\Enums;

use Filament\Support\Contracts\HasColor;
use Filament\Support\Contracts\HasIcon;
use Filament\Support\Contracts\HasLabel;

enum AlertTypeEnum: string implements HasColor, HasIcon, HasLabel
{
    case INFO = 'info';
    case WARNING = 'warning';
    case DANGER = 'danger';

    public function getLabel(): string
    {
        return match ($this) {
            AlertTypeEnum::INFO => 'Info',
            AlertTypeEnum::WARNING => 'Warning',
            AlertTypeEnum::DANGER => 'Danger',
        };
    }

    public function getIcon(): string
    {
        return match ($this) {
            AlertTypeEnum::INFO => 'heroicon-o-information-circle',
            AlertTypeEnum::WARNING => 'heroicon-o-exclamation-circle',
            AlertTypeEnum::DANGER => 'heroicon-o-exclamation-triangle',
        };
    }

    public function getColor(): string
    {
        return match ($this) {
            AlertTypeEnum::INFO => 'info',
            AlertTypeEnum::WARNING => 'warning',
            AlertTypeEnum::DANGER => 'danger',
        };
    }
}
Step 3: Middleware for displaying alerts
Middleware ensures that notifications are displayed to users as they browse the site. The alerts are filtered so that only new, active notifications appear.
- Create the middleware:
php artisan make:middleware AlertMiddleware
- Modify
app/Http/Middleware/AlertMiddleware.php:
namespace App\Http\Middleware;
use App\Models\Alert;
use Closure;
use Filament\Notifications\Actions\Action;
use Filament\Notifications\Notification;
use Illuminate\Http\Request;
class AlertMiddleware
{
public function handle(Request $request, Closure $next)
{
$alertQuery = Alert::query()
->published()
->whereNotIn('id', session()->get('read_alerts.id', []))
->limit(3); //Retrieving only 3 max alerts
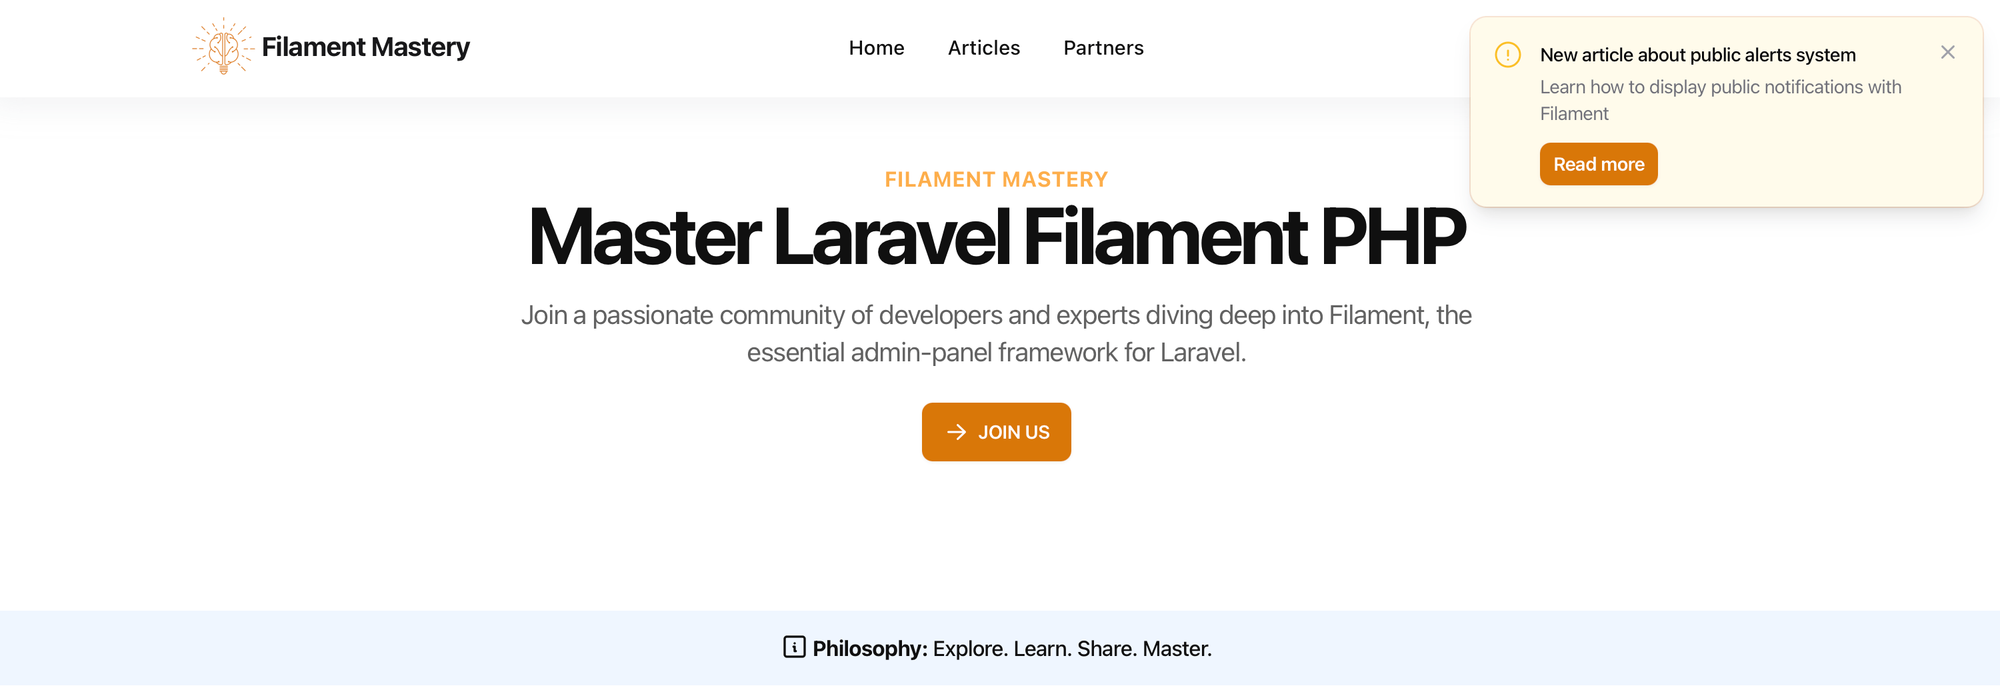
foreach ($alertQuery->get() as $alert) {
Notification::make()
->icon($alert->type->getIcon())
->iconColor($alert->type->getColor())
->color($alert->type->getColor())
->title($alert->title)
->body(nl2br($alert->message))
->actions(fn() => $alert->read_more_link ? [Action::make('read_more')->label('Read more')->url($alert->read_more_link)->openUrlInNewTab()->button()] : [])
->persistent()
->send();
session()->push('read_alerts.id', $alert->id); //Registering alert id on current session
}
return $next($request);
}
}
alerts will only be shown once per session and will not reappear unless the session is reset.
- Register middleware on public routes:
Route::middleware([\App\Http\Middleware\AlertMiddleware::class])->group(function () {
    //...
});
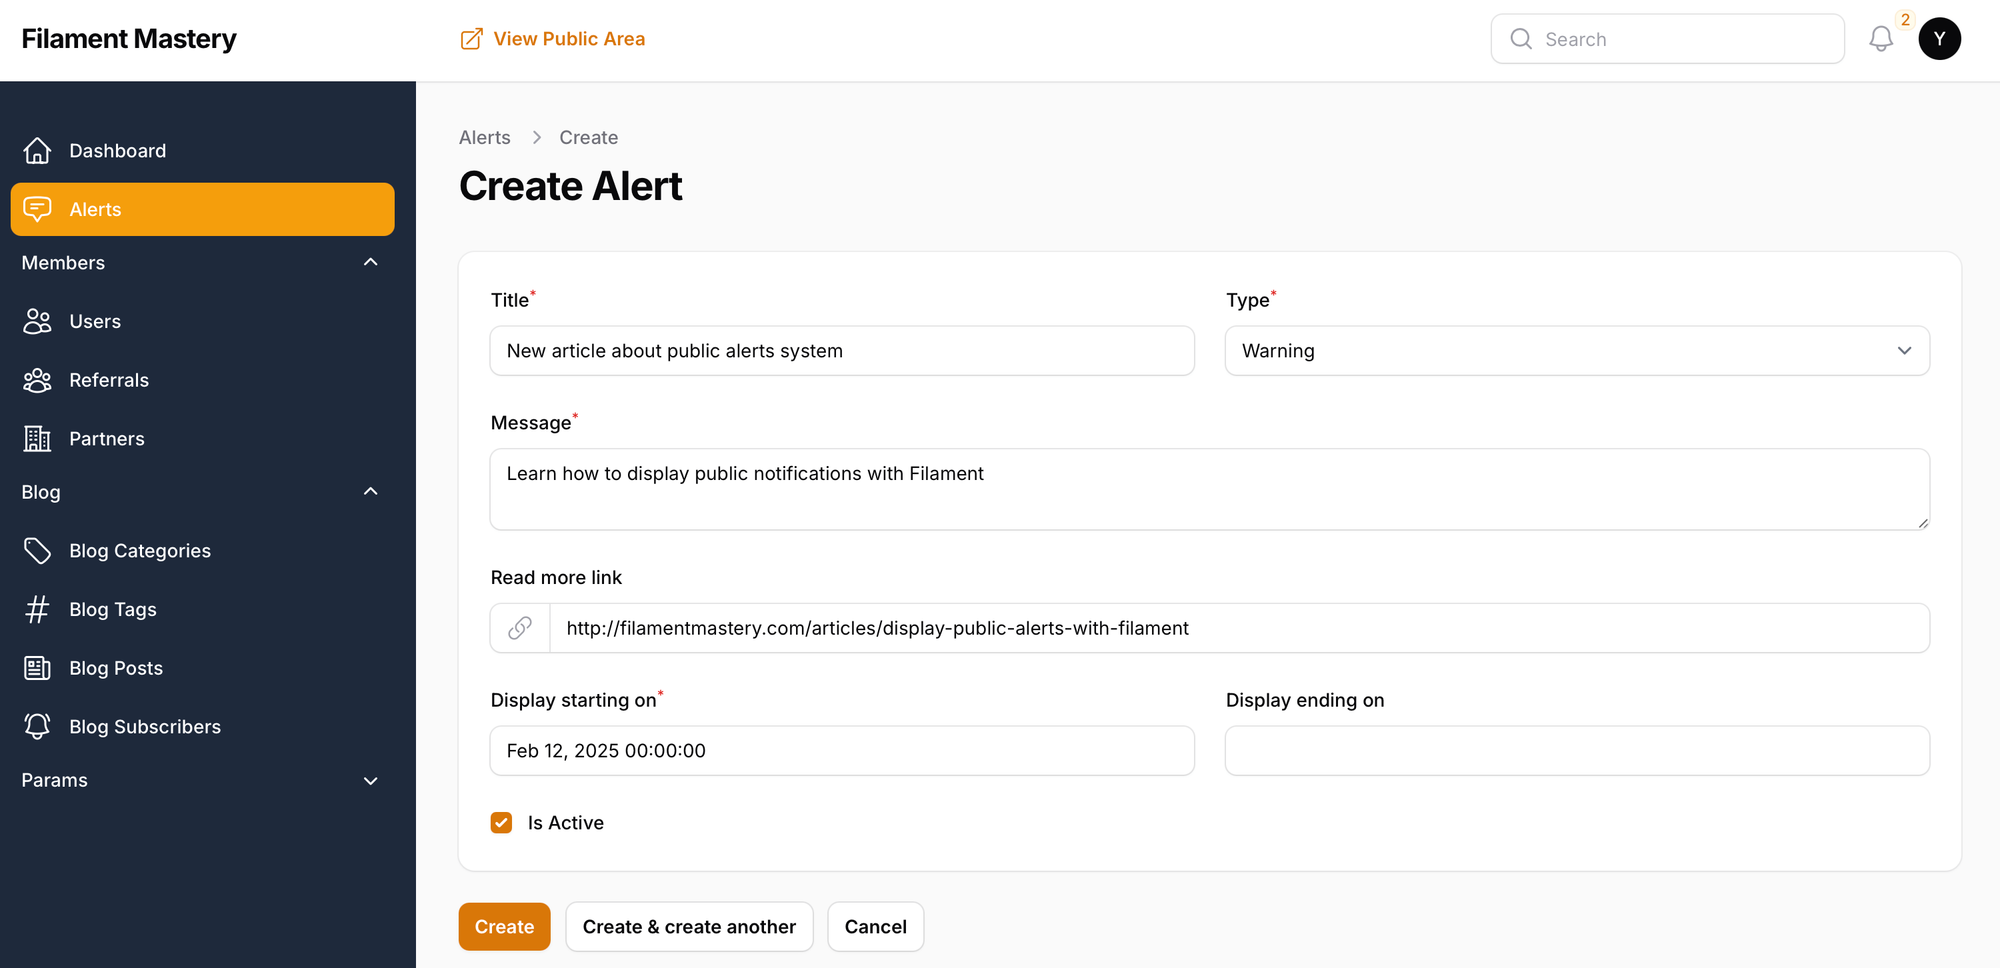
Of course, you can register this middleware in the Kernel.php file and use an alias when declaring route middleware.Step 4: Add backend management with Filament Resource
Using Filament, we can create a resource to manage alerts directly from the admin panel.
- Create the
AlertResource:
php artisan make:filament-resource Alert
- Update
app/Filament/Resources/AlertResource.php:
namespace App\Filament\Resources;

use App\Enums\AlertTypeEnum;
use App\Models\Alert;
use Filament\Forms;
use Filament\Resources\Resource;
use Filament\Tables;

class AlertResource extends Resource
{
    //...

    public static function form(Form $form): Form
    {
        return $form
            ->schema([
                Forms\Components\Section::make()
                    ->schema([
                        Forms\Components\TextInput::make('title')
                            ->required()
                            ->maxLength(255),
                        Forms\Components\Select::make('type')
                            ->options(AlertTypeEnum::class)
                            ->required(),
                        Forms\Components\Textarea::make('message')
                            ->required()
                            ->columnSpanFull(),
                        Forms\Components\TextInput::make('read_more_link')
                            ->prefixIcon('heroicon-o-link')
                            ->nullable()
                            ->url()
                            ->maxLength(255)
                            ->columnSpanFull(),
                        DatetimePicker::make('started_display_at')
                            ->native(false)
                            ->required(),
                        DatetimePicker::make('ended_display_at')
                            ->native(false)
                            ->nullable()
                            ->after('started_display_at'),
                        Forms\Components\Checkbox::make('is_active'),
                    ])->columns(2),
            ]);
    }

    public static function table(Table $table): Table
    {
        return $table
            ->columns([
                TextColumn::make('title')
                    ->searchable()
                    ->wrap(),
                Tables\Columns\IconColumn::make('is_active')
                    ->boolean(),
                TextColumn::make('type'),
                TextColumn::make('started_display_at')
                    ->dateTime('d/m/Y H:i')
                    ->sortable(),
                TextColumn::make('ended_display_at')
                    ->dateTime('d/m/Y H:i')
                    ->sortable(),
            ])
            ->actions([
                Tables\Actions\EditAction::make(),
                Tables\Actions\DeleteAction::make(),
            ])
            ->defaultSort('started_display_at', 'desc');
    }
}
Conclusion
With these steps, you now have a fully functional public alert system using Filament in Laravel. Users will see important alerts while you can manage them efficiently from the admin panel. 🚀
Here's a look at how the backend configuration works: